今回はReact Routerでページ遷移を行ってみます。今現在のバージョンは、6.4.5です。
公式チュートリアルでviteを使っているので、viteを使ってインストールしてみます。
viteを使ってReactをインストール
ターミナルで、
npm create vite@latest react-router -- --template reactを実行します。
npmのバージョンが7以上だと、余分なダブルダッシュ(–)が必要みたいです。
「react-router」としてあるのは、今回のプロジェクト名です。
完了すると、
cd react-router
npm install
npm run dev
を「走らせろ」とでるので、それぞれ実行します。
完了して、http://localhost:5173/ にアクセスすると、Vite + React のページが表示されます。
React Routerをインストール
次にReact Routerをインストールします。
実行中のReactをCtrl+C で止めて、
npm install react-router-domを実行します。
React Routerがインストールされました。
ディレクトリ構造の整理
まず、使わないファイルを削除します。
src直下のApp.js, App.cssは使わないので削除。
src直下にroutesディレクトリを作ります。
現在src直下には、main.jsxとindex.cssと空のroutes/しかない状態です。
index.cssは中身をすべて削除しておきます。
Browser Routerを作る
main.jsxの中でBrowser Routerを作ります。
まず、ファイルの上の方で createBrowserRouter, RouterProvider をimportします。
import { createBrowserRouter, RouterProvider } from "react-router-dom";次に、import文とReactDOM文の間に、
const router = createBrowserRouter([
  {
    path: "/",
    element: <div>Hello world!</div>,
  },
]);
を書きます。
次にReact.DOM以下の文を少しだけ書き換えます。
ReactDOM.createRoot(document.getElementById("root")).render(
  <React.StrictMode>
    <RouterProvider router={router} />
  </React.StrictMode>
);
そして保存します。
現在のmain.jsxのコードはこんな感じです。
import React from "react";
import ReactDOM from "react-dom/client";
import {
  createBrowserRouter,
  RouterProvider,
} from "react-router-dom";
import "./index.css";

const router = createBrowserRouter([
  {
    path: "/",
    element: <div>Hello world!</div>,
  },
]);

ReactDOM.createRoot(document.getElementById("root")).render(
  <React.StrictMode>
    <RouterProvider router={router} />
  </React.StrictMode>
);
この時点で npm run devをして、ルートディレクトリをブラウザで確認すると、
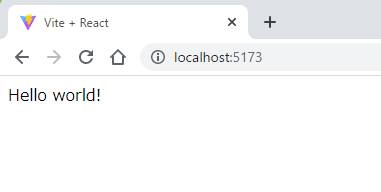
と表示されます。
この<div>Hello world!</div>の部分を任意のコンポーネントに置き換えれば、そのコンポーネントが表示されるわけですね。
次行きましょう。
Rootコンポーネントを作る
上の<div>Hello world!</div>の代わりに表示するRootコンポーネントを作ります。
src/routes/ディレクトリ直下にroot.jsxを用意します。
中身はこんな感じ。
import { Outlet, Link } from "react-router-dom";

export default function Root() {
  return (
    <>
      <h1>株式会社〇〇〇〇</h1>
      <nav>
        <Link to={"/"}>TOP</Link>
        <Link to={"/about"}>会社概要</Link>
        <Link to={"/access"}>アクセス</Link>
        <Link to={"/contact"}>お問い合わせ</Link>
      </nav>
      <Outlet />
    </>
  );
}
よくある会社のWebサイト風にしてみました。ナビゲーションメニューも用意しておきます。
Linkはブラウザ上で<a>タグになります。使い方は何となく分かると思います。
Outletの部分には、後で作成する各ページの内容が表示されます。
そして先程のmain.jsxのrouterを少し書き換えます。
const router = createBrowserRouter([
  {
    path: "/",
    element: <Root />,
  },
]);
ナビゲーションが見やすいように少しCSSを加えました。
index.cssです。
a {
  margin: 10px;
}
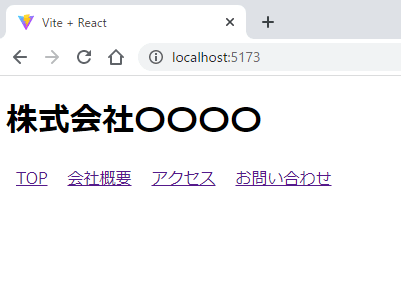
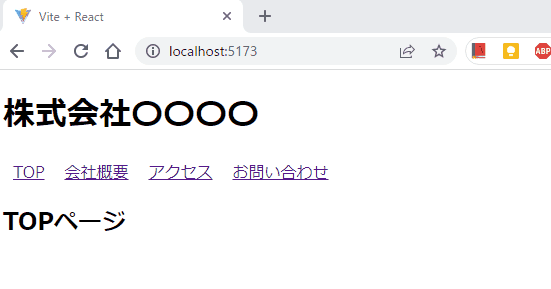
そしてブラウザで表示するとこんな感じになります。
各ページを作る
では各ページを作っていきましょう。
まずはTOPページからです。
TOPページを作る
src/routes/直下にindex.jsxファイルを作成し下記のコードを書きます。
export default function Index() {
  return <h2>TOPページ</h2>;
}
H2タグで、「TOPページ」と表示するだけですが、これでコンポーネント作成完了です。
exportを忘れずに。
次に、main.jsxを編集します。
先程作ったIndexコンポーネントを読み込み、
import Index from "./routes/index";routerを編集します。
const router = createBrowserRouter([
  {
    path: "/",
    element: <Root />,
    children: [
      { index: true, element: <Index /> }
    ],
  },
]);
オブジェクト内にchildrenのarrayを追加して、その中にさらにオブジェクトを追加します。
index: true はURLのroot(http://localhost:5173/)にアクセスすると表示されることを指します。
elementは先程作ったIndexコンポーネントですね。
ブラウザで表示を確認してみましょう。
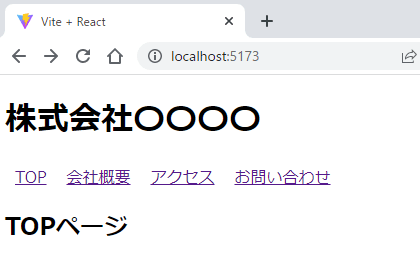
root.jsxで<Outlet />を配置した場所に、<Index />コンポーネントが表示されていますね。
他の下層ページを作る
ではTOPページ以外の下層ページを作っていきましょう。
src/routes/の直下に、about.jsx, access.jsx, contact.jsxというファイルを作成し中身を埋めます。
まずはabout.jsxです。
export default function About() {
  return <h2>会社概要</h2>;
}
access.jsx。
export default function Access() {
  return <h2>アクセス</h2>;
}
contact.jsx。
export default function Contact() {
  return <h2>お問い合わせ</h2>;
}
簡素ですが、これで下層ページのコンポーネントが揃いました。
次に、main.jsxを編集します。
main.jsxの上の方で、3つのコンポーネントをimport。
import Contact from "./routes/contact";
import About from "./routes/about";
import Access from "./routes/access";
routerも編集します。
const router = createBrowserRouter([
  {
    path: "/",
    element: <Root />,
    children: [
      { index: true, element: <Index /> },
      { path: "/contact", element: <Contact /> },
      { path: "/about", element: <About /> },
      { path: "/access", element: <Access /> },
    ],
  },
]);
先程追加したIndexコンポーネントの下に、オブジェクトで3つ並べます。
pathはそのままパスを指定して、elementは先程importしたコンポーネントですね。
このあたりはわかりやすいかと思います。
では、ブラウザで表示してみましょう。
http://localhost:5173/にアクセスしてナビゲーションリンクをクリックしてみます。
きちんと表示されましたね。
それぞれのリンクをクリックすると、URLも変わり、ページの内容も変わっているのがわかります。
一方、「株式会社〇〇〇〇」とナビゲーションリンクは変わらず表示されています。
エラーページを用意する
存在しないページにアクセスした際に表示されるエラーページも用意しておきましょう。
srcディレクトリ直下に、error-page.jsxというファイルを作ってErrorPageコンポーネントを作成します。
import { useRouteError } from "react-router-dom";

export default function ErrorPage() {
  const error = useRouteError();
  console.error(error);

  return (
    <>
      <h2>エラーページ</h2>
      <p>{error.statusText || error.message}</p>
    </>
  );
}
react-router-domのuseRouteErrorを使うと、エラーオブジェクトを取得できます。
error.statusTextがあれば表示され、なければerror.messageが表示されます。
exportも忘れずに。
次にmain.jsxを編集します。
上の方で、ErrorPageコンポーネントをimportします。
import ErrorPage from "./error-page";
そしてrouterに加筆します。
const router = createBrowserRouter([
  {
    path: "/",
    element: <Root />,
    errorElement: <ErrorPage />,
    children: [
      { index: true, element: <Index /> },
      { path: "/contact", element: <Contact /> },
      { path: "/about", element: <About /> },
      { path: "/access", element: <Access /> },
    ],
  },
]);
オブジェクト内に、errorElement: <ErrorPage />という行が追加されました。
これで、エラーが起きたらErrorPageコンポーネントが表示されるようになりました。
ブラウザで確認するとこんな感じです。

以上です。
今回書いたコード
最後にすべてのコードを載せておきます。
ディレクトリ構造はこうです。
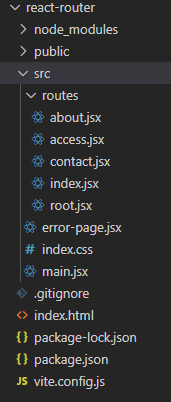
src/main.jsx
import React from "react";
import ReactDOM from "react-dom/client";
import { createBrowserRouter, RouterProvider } from "react-router-dom";
import "./index.css";
import Root from "./routes/root";
import ErrorPage from "./error-page";
import Index from "./routes/index";
import Contact from "./routes/contact";
import About from "./routes/about";
import Access from "./routes/access";

const router = createBrowserRouter([
  {
    path: "/",
    element: <Root />,
    errorElement: <ErrorPage />,
    children: [
      { index: true, element: <Index /> },
      { path: "/contact", element: <Contact /> },
      { path: "/about", element: <About /> },
      { path: "/access", element: <Access /> },
    ],
  },
]);

ReactDOM.createRoot(document.getElementById("root")).render(
  <React.StrictMode>
    <RouterProvider router={router} />
  </React.StrictMode>
);
src/index.css
a {
  margin: 10px;
}
src/error-page.jsx
import { useRouteError } from "react-router-dom";

export default function ErrorPage() {
  const error = useRouteError();
  console.error(error);

  return (
    <>
      <h2>エラーページ</h2>
      <p>{error.statusText || error.message}</p>
    </>
  );
}
src/routes/root.jsx
import { Outlet, Link } from "react-router-dom";

export default function Root() {
  return (
    <>
      <h1>株式会社〇〇〇〇</h1>
      <nav>
        <Link to={"/"}>TOP</Link>
        <Link to={"/about"}>会社概要</Link>
        <Link to={"/access"}>アクセス</Link>
        <Link to={"/contact"}>お問い合わせ</Link>
      </nav>
      <Outlet />
    </>
  );
}
src/routes/index.jsx
export default function Index() {
  return <h2>TOPページ</h2>;
}
src/routes/about.jsx
export default function About() {
  return <h2>会社概要</h2>;
}
src/routes/access.jsx
export default function Access() {
  return <h2>アクセス</h2>;
}
src/routes/contact.jsx
export default function Contact() {
  return <h2>お問い合わせ</h2>;
}

コメント